# Docker安装
# 系统准备
# 机器准备
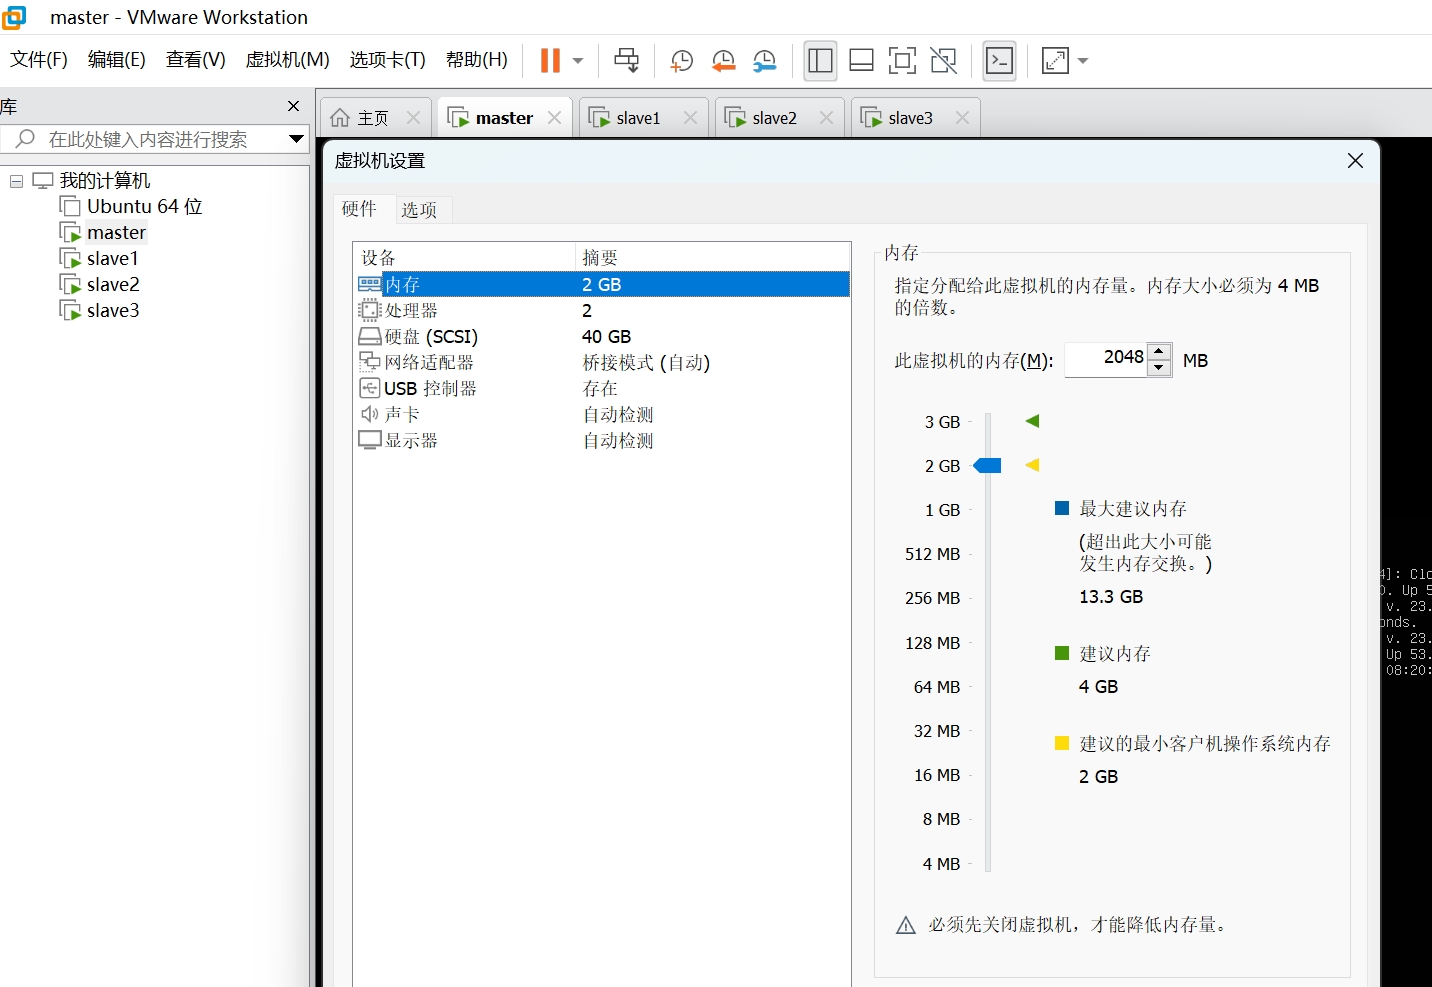
准备4台机器,至少2GB内存, 至少2个CPU。如果资源不够,可以用虚拟机,安装Ubuntu 22.04以上操作系统,本实验所用的版本号为:Ubuntu 22.04.4 LTS,机器规划如下:
| Hostname | IP Address | User |
|---|---|---|
| master | 192.168.3.201 | root |
| slave1 | 192.168.3.202 | root |
| slave2 | 192.168.3.203 | root |
| slave3 | 192.168.3.204 | root |
其中Pod网络地址分配如下:10.244.0.0/16,Service网络地址分配如下:10.96.0.0/12
# 安装
# 官网文档
# 安装cri-docker
https://github.com/Mirantis/cri-dockerd/releases (opens new window)下载最新版cridockerd
sudo dpkg -i cridockerd_0.3.15.3-0.ubuntu-jammy_amd64.deb
sudo systemctl start cri-docker
sudo systemctl enable cri-docker
sudo systemctl status cri-docker

# 安装k8s软件
sudo apt-get update
# apt-transport-https may be a dummy package; if so, you can skip that package
sudo apt-get install -y apt-transport-https ca-certificates curl gpg
# If the directory `/etc/apt/keyrings` does not exist, it should be created before the curl command, read the note below.
# sudo mkdir -p -m 755 /etc/apt/keyrings
curl -fsSL https://pkgs.k8s.io/core:/stable:/v1.30/deb/Release.key | sudo gpg --dearmor -o /etc/apt/keyrings/kubernetes-apt-keyring.gpg

# This overwrites any existing configuration in /etc/apt/sources.list.d/kubernetes.list
echo 'deb [signed-by=/etc/apt/keyrings/kubernetes-apt-keyring.gpg] https://pkgs.k8s.io/core:/stable:/v1.30/deb/ /' | sudo tee /etc/apt/sources.list.d/kubernetes.list
sudo apt-get update
sudo apt-get install -y kubelet kubeadm kubectl
sudo apt-mark hold kubelet kubeadm kubectl
sudo systemctl enable --now kubelet
# 部署集群master
# kubeadm
kubeadm config images list
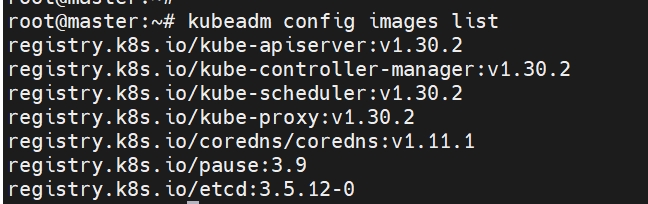
# master docker images
docker pull registry.k8s.io/kube-apiserver:v1.30.2
docker pull registry.k8s.io/kube-controller-manager:v1.30.2
docker pull registry.k8s.io/kube-scheduler:v1.30.2
docker pull registry.k8s.io/kube-proxy:v1.30.2
docker pull registry.k8s.io/coredns/coredns:v1.11.1
docker pull registry.k8s.io/pause:3.9
docker pull registry.k8s.io/etcd:3.5.12-0
# init
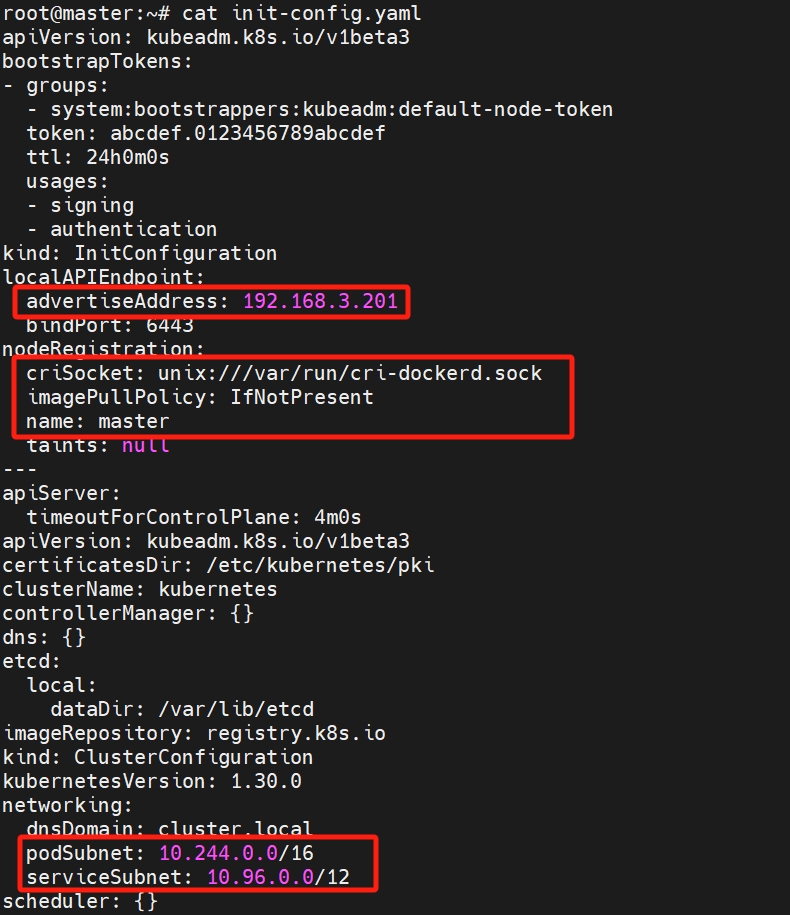
kubeadm config print init-defaults > init-config.yaml
# 编辑init-config.yaml
apiVersion: kubeadm.k8s.io/v1beta3
bootstrapTokens:
- groups:
  - system:bootstrappers:kubeadm:default-node-token
  token: abcdef.0123456789abcdef
  ttl: 24h0m0s
  usages:
  - signing
  - authentication
kind: InitConfiguration
localAPIEndpoint:
  advertiseAddress: 192.168.3.201
  bindPort: 6443
nodeRegistration:
  criSocket: unix:///var/run/cri-dockerd.sock
  imagePullPolicy: IfNotPresent
  name: master
  taints: null
---
apiServer:
  timeoutForControlPlane: 4m0s
apiVersion: kubeadm.k8s.io/v1beta3
certificatesDir: /etc/kubernetes/pki
clusterName: kubernetes
controllerManager: {}
dns: {}
etcd:
  local:
    dataDir: /var/lib/etcd
imageRepository: registry.k8s.io
kind: ClusterConfiguration
kubernetesVersion: 1.30.0
networking:
  dnsDomain: cluster.local
  podSubnet: 10.244.0.0/16
  serviceSubnet: 10.96.0.0/12
scheduler: {}
# 检查
kubeadm init phase preflight --config=init-config.yaml

# 初始化
kubeadm init --config=init-config.yaml
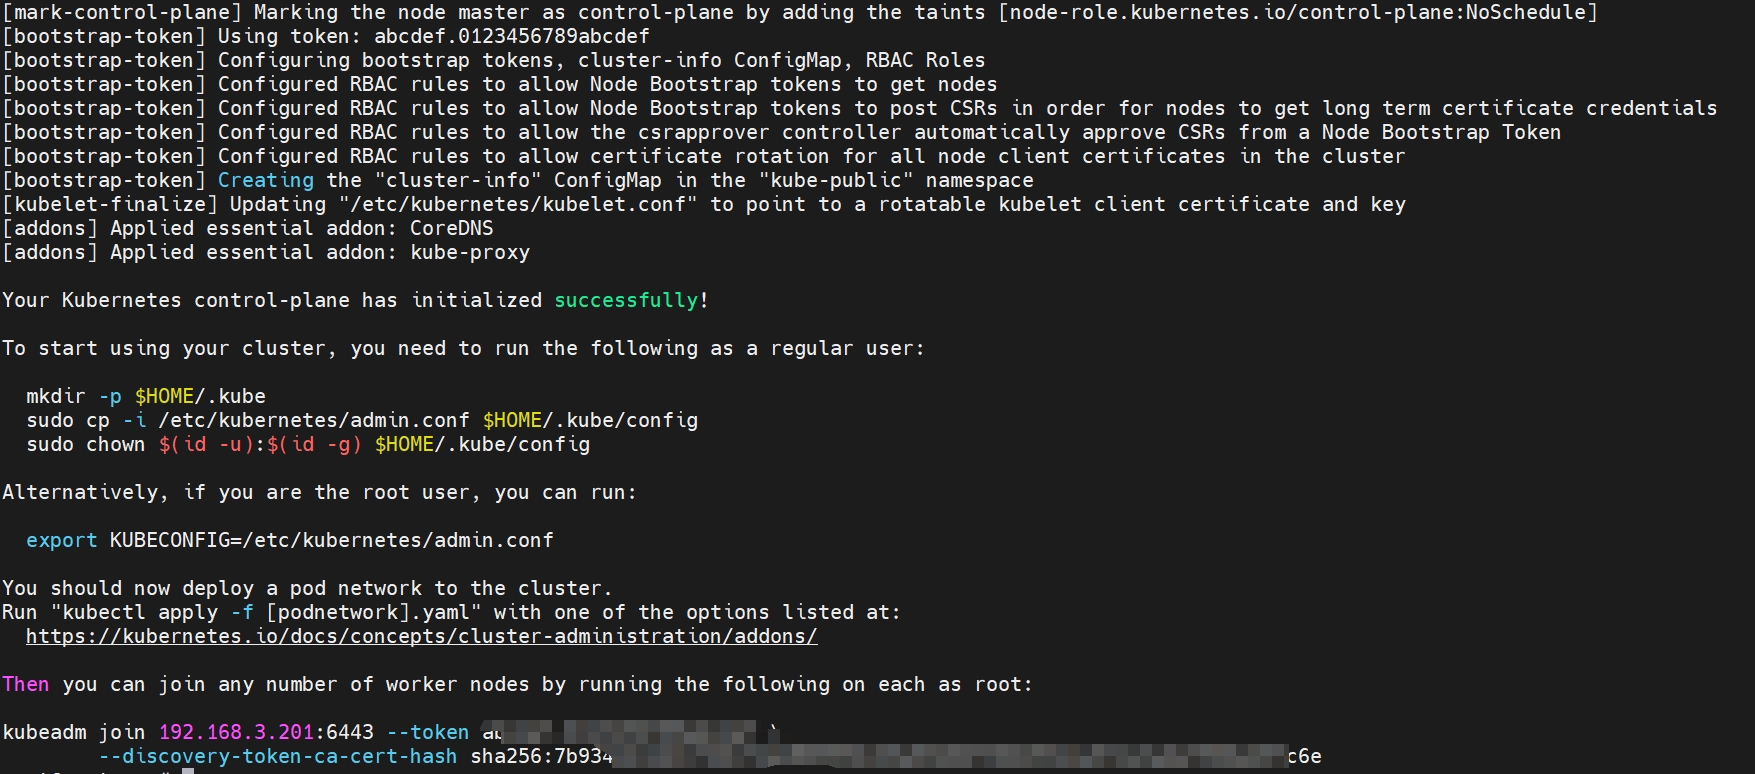
# 安装日志
root@master:~# kubeadm init --config=init-config.yaml
[init] Using Kubernetes version: v1.30.0
[preflight] Running pre-flight checks
[preflight] Pulling images required for setting up a Kubernetes cluster
[preflight] This might take a minute or two, depending on the speed of your internet connection
[preflight] You can also perform this action in beforehand using 'kubeadm config images pull'
[certs] Using certificateDir folder "/etc/kubernetes/pki"
[certs] Generating "ca" certificate and key
[certs] Generating "apiserver" certificate and key
[certs] apiserver serving cert is signed for DNS names [kubernetes kubernetes.default kubernetes.default.svc kubernetes.default.svc.cluster.local master] and IPs [10.96.0.1 192.168.3.201]
[certs] Generating "apiserver-kubelet-client" certificate and key
[certs] Generating "front-proxy-ca" certificate and key
[certs] Generating "front-proxy-client" certificate and key
[certs] Generating "etcd/ca" certificate and key
[certs] Generating "etcd/server" certificate and key
[certs] etcd/server serving cert is signed for DNS names [localhost master] and IPs [192.168.3.201 127.0.0.1 ::1]
[certs] Generating "etcd/peer" certificate and key
[certs] etcd/peer serving cert is signed for DNS names [localhost master] and IPs [192.168.3.201 127.0.0.1 ::1]
[certs] Generating "etcd/healthcheck-client" certificate and key
[certs] Generating "apiserver-etcd-client" certificate and key
[certs] Generating "sa" key and public key
[kubeconfig] Using kubeconfig folder "/etc/kubernetes"
[kubeconfig] Writing "admin.conf" kubeconfig file
[kubeconfig] Writing "super-admin.conf" kubeconfig file
[kubeconfig] Writing "kubelet.conf" kubeconfig file
[kubeconfig] Writing "controller-manager.conf" kubeconfig file
[kubeconfig] Writing "scheduler.conf" kubeconfig file
[etcd] Creating static Pod manifest for local etcd in "/etc/kubernetes/manifests"
[control-plane] Using manifest folder "/etc/kubernetes/manifests"
[control-plane] Creating static Pod manifest for "kube-apiserver"
[control-plane] Creating static Pod manifest for "kube-controller-manager"
[control-plane] Creating static Pod manifest for "kube-scheduler"
[kubelet-start] Writing kubelet environment file with flags to file "/var/lib/kubelet/kubeadm-flags.env"
[kubelet-start] Writing kubelet configuration to file "/var/lib/kubelet/config.yaml"
[kubelet-start] Starting the kubelet
[wait-control-plane] Waiting for the kubelet to boot up the control plane as static Pods from directory "/etc/kubernetes/manifests"
[kubelet-check] Waiting for a healthy kubelet. This can take up to 4m0s
[kubelet-check] The kubelet is healthy after 2.016885542s
[api-check] Waiting for a healthy API server. This can take up to 4m0s
[api-check] The API server is healthy after 11.001228413s
[upload-config] Storing the configuration used in ConfigMap "kubeadm-config" in the "kube-system" Namespace
[kubelet] Creating a ConfigMap "kubelet-config" in namespace kube-system with the configuration for the kubelets in the cluster
[upload-certs] Skipping phase. Please see --upload-certs
[mark-control-plane] Marking the node master as control-plane by adding the labels: [node-role.kubernetes.io/control-plane node.kubernetes.io/exclude-from-external-load-balancers]
[mark-control-plane] Marking the node master as control-plane by adding the taints [node-role.kubernetes.io/control-plane:NoSchedule]
[bootstrap-token] Using token: abcdef.0123456789abcdef
[bootstrap-token] Configuring bootstrap tokens, cluster-info ConfigMap, RBAC Roles
[bootstrap-token] Configured RBAC rules to allow Node Bootstrap tokens to get nodes
[bootstrap-token] Configured RBAC rules to allow Node Bootstrap tokens to post CSRs in order for nodes to get long term certificate credentials
[bootstrap-token] Configured RBAC rules to allow the csrapprover controller automatically approve CSRs from a Node Bootstrap Token
[bootstrap-token] Configured RBAC rules to allow certificate rotation for all node client certificates in the cluster
[bootstrap-token] Creating the "cluster-info" ConfigMap in the "kube-public" namespace
[kubelet-finalize] Updating "/etc/kubernetes/kubelet.conf" to point to a rotatable kubelet client certificate and key
[addons] Applied essential addon: CoreDNS
[addons] Applied essential addon: kube-proxy

Your Kubernetes control-plane has initialized successfully!

To start using your cluster, you need to run the following as a regular user:

  mkdir -p $HOME/.kube
  sudo cp -i /etc/kubernetes/admin.conf $HOME/.kube/config
  sudo chown $(id -u):$(id -g) $HOME/.kube/config

Alternatively, if you are the root user, you can run:

  export KUBECONFIG=/etc/kubernetes/admin.conf

You should now deploy a pod network to the cluster.
Run "kubectl apply -f [podnetwork].yaml" with one of the options listed at:
  https://kubernetes.io/docs/concepts/cluster-administration/addons/

Then you can join any number of worker nodes by running the following on each as root:

kubeadm join 192.168.3.201:6443 --token abcdef.0123456789abcdef \
        --discovery-token-ca-cert-hash sha256:7b9342b1dd11fb61fded889950c69a93b80f380293dca572e3a0ef968eb9fc6e
# kube config
mkdir -p $HOME/.kube
sudo cp -i /etc/kubernetes/admin.conf $HOME/.kube/config
sudo chown $(id -u):$(id -g) $HOME/.kube/config
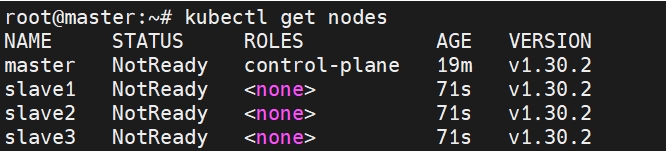
# get nodes
kubectl get nodes
# 部署集群node
# node docker images
docker pull registry.k8s.io/kube-proxy:v1.30.2
docker pull registry.k8s.io/etcd:3.5.12-0
# join
kubeadm join 192.168.3.201:6443 --token abcdef.0123456789abcdef \
        --discovery-token-ca-cert-hash sha256:7b9342b1dd11fb61fded889950c69a93b80f380293dca572e3a0ef968eb9fc6e

kubeadm config print join-defaults > join-config.yaml

apiVersion: kubeadm.k8s.io/v1beta3
caCertPath: /etc/kubernetes/pki/ca.crt
discovery:
  bootstrapToken:
    apiServerEndpoint: 192.168.3.201:6443
    token: abcdef.0123456789abcdef
    unsafeSkipCAVerification: true
  timeout: 5m0s
  tlsBootstrapToken: abcdef.0123456789abcdef
kind: JoinConfiguration
nodeRegistration:
  criSocket: unix:///var/run/cri-dockerd.sock
  imagePullPolicy: IfNotPresent
  name: slave1
  taints: null

# 检查
kubeadm join phase preflight --config=join-config.yaml

# join
kubeadm join --config=join-config.yaml
# join日志
root@slave1:~# kubeadm join --config=join-config.yaml
[preflight] Running pre-flight checks
[preflight] Reading configuration from the cluster...
[preflight] FYI: You can look at this config file with 'kubectl -n kube-system get cm kubeadm-config -o yaml'
[kubelet-start] Writing kubelet configuration to file "/var/lib/kubelet/config.yaml"
[kubelet-start] Writing kubelet environment file with flags to file "/var/lib/kubelet/kubeadm-flags.env"
[kubelet-start] Starting the kubelet
[kubelet-check] Waiting for a healthy kubelet. This can take up to 4m0s
[kubelet-check] The kubelet is healthy after 2.021493704s
[kubelet-start] Waiting for the kubelet to perform the TLS Bootstrap

This node has joined the cluster:
* Certificate signing request was sent to apiserver and a response was received.
* The Kubelet was informed of the new secure connection details.

Run 'kubectl get nodes' on the control-plane to see this node join the cluster.
# 时钟同步
# hosts
root@master:~# cat /etc/hosts
127.0.0.1 localhost
192.168.3.201 master
192.168.3.202 slave1
192.168.3.203 slave2
192.168.3.204 slave3
# 时区
date
cp /usr/share/zoneinfo/Asia/Shanghai /etc/localtime
date
# 时区
apt-get install ntp
systemctl restart ntp

#master
restrict 192.168.3.0 mask 255.255.255.0 nomodify notrap

#slave
server 192.168.3.201 iburst

ntpd -gq
ntpq -p
# 部署网络插件
# 安装CNI网络插件
默认安装完状态是NotReady,需要安装CNI网络插件
# 安装calico
https://docs.tigera.io/calico/latest/getting-started/kubernetes/quickstart (opens new window)
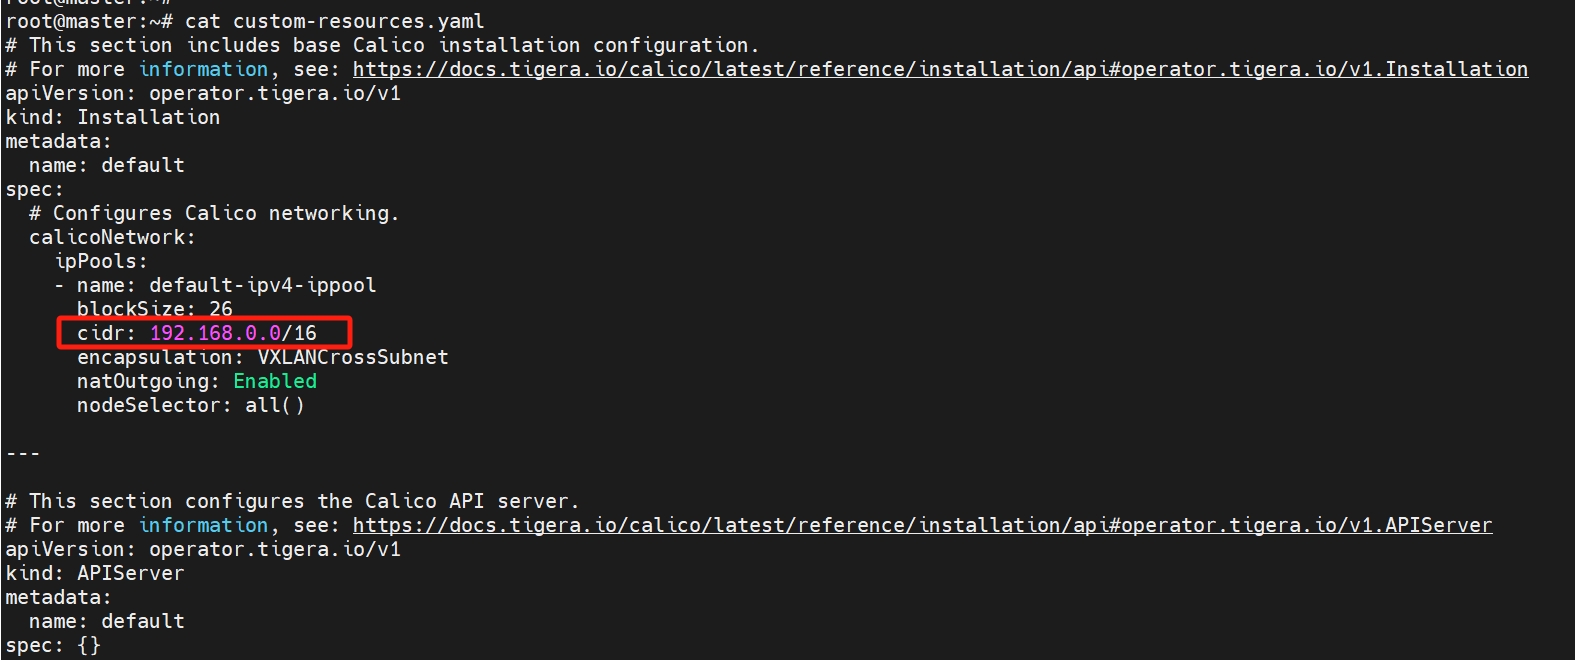
先下载到本地,修改cidr: 192.168.0.0/16为10.244.0.0/16
curl -O https://raw.githubusercontent.com/projectcalico/calico/v3.28.0/manifests/tigera-operator.yaml
curl -O https://raw.githubusercontent.com/projectcalico/calico/v3.28.0/manifests/custom-resources.yaml
vi custom-resources.yaml

kubectl create -f tigera-operator.yaml
kubectl create -f custom-resources.yaml


kubectl logs calico-node-m8mh2 -n calico-system -c install-cni
# 检查
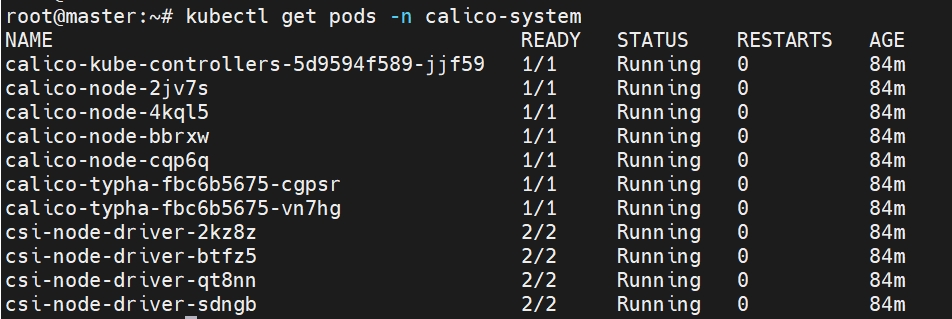
watch kubectl get pods -n calico-system
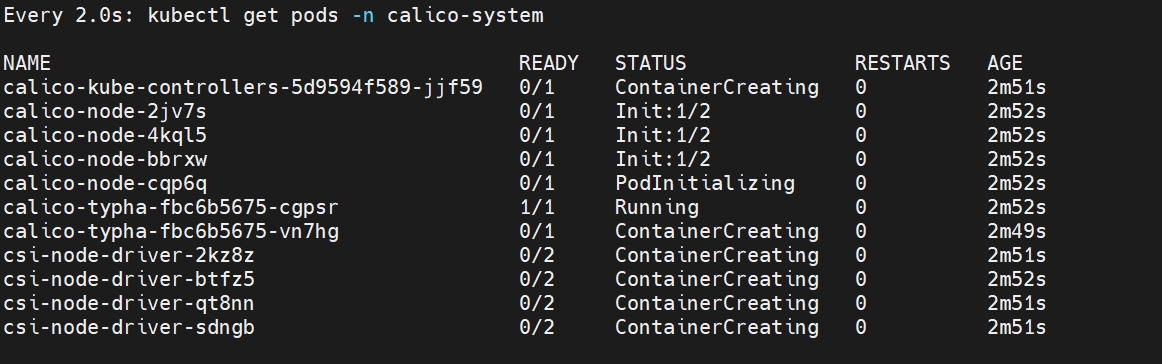
kubectl get pods -n calico-system
# 检查nodes
kubectl get nodes -o wide

# 删除重置calico
https://www.cnblogs.com/huangjiabobk/p/18121787 (opens new window)
kubectl delete -f custom-resources.yaml
kubectl delete -f tigera-operator.yaml
rm -rf /etc/cni/net.d
rm -rf /var/log/calico


#kubectl delete crd --all
kubectl get crd | grep 'calico' | awk '{print $1}' | xargs kubectl delete crd
kubectl delete all --all -n calico-system --force --grace-period=0
kubectl delete ns calico-sytem --force --grace-period=0

kubectl proxy
kubectl get ns calico-system  -o json > calico-system.json
curl -k -H Content-Type:application/json -X PUT --data-binary @calico-system.json http://127.0.0.1:8001/api/v1/namespaces/calico-system/finalize

kubectl get crd installations.operator.tigera.io -o yaml

kubectl patch crd installations.operator.tigera.io -p '{"metadata":{"finalizers":[]}}' --type=merge
kubectl delete crd installations.operator.tigera.io

kubectl patch installations.operator.tigera.io default -p '{"metadata":{"finalizers":[]}}' --type=merge
kubectl delete installations.operator.tigera.io default

kubectl get crd apiservers.operator.tigera.io -o yaml

kubectl patch crd apiservers.operator.tigera.io -p '{"metadata":{"finalizers":[]}}' --type=merge
kubectl delete crd apiservers.operator.tigera.io

kubectl patch apiservers.operator.tigera.io default -p '{"metadata":{"finalizers":[]}}' --type=merge
kubectl delete apiservers.operator.tigera.io default
# master参与调度(可选)
kubectl taint nodes --all node-role.kubernetes.io/control-plane-node/master untainted
# nginx demo
# 创建deployment
kubectl apply -f hello-deployment.yaml
apiVersion: apps/v1
kind: Deployment
metadata:
  labels:
    app: hello-k8s-demo
  name: hello-deployment
spec:
  replicas: 2
  selector:
    matchLabels:
      app: hello-k8s-demo
  template:
    metadata:
      labels:
        app: hello-k8s-demo
    spec:
      containers:
      - image: docker.io/nginx:latest
        name: hello-k8s
        ports:
        - containerPort: 80
# 创建service
kubectl apply -f hello-service.yaml
apiVersion: v1
kind: Service
metadata:
  name: hello-service
spec:
  selector:
    app: hello-k8s-demo
  ports:
    - protocol: TCP
      port: 81
      targetPort: 80
      nodePort: 30001
  type: NodePort
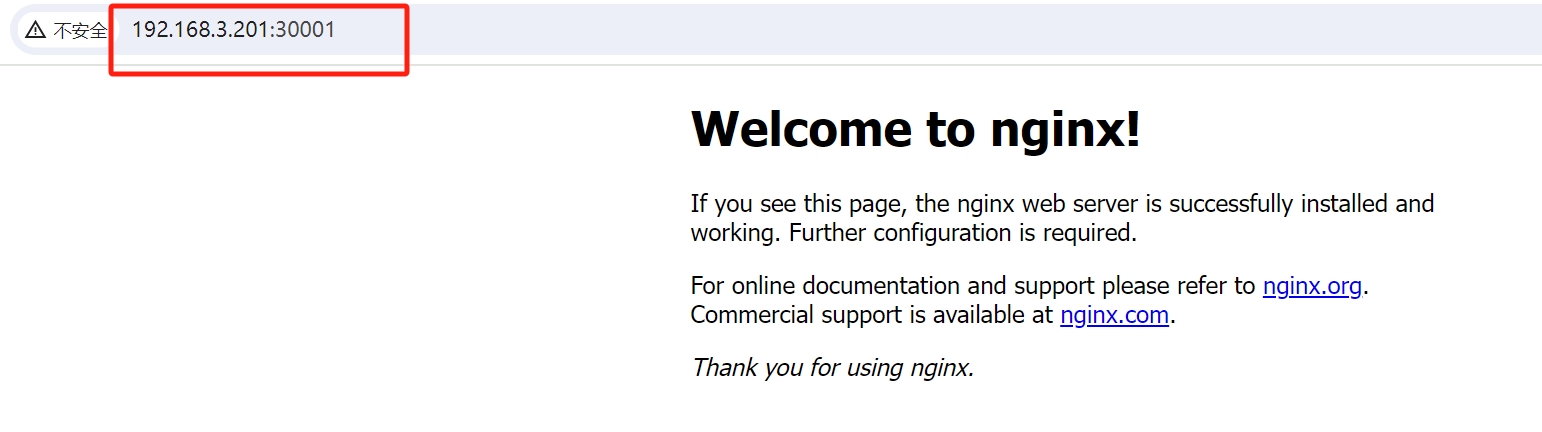
# 访问service
kubectl get svc,pod,deployment -o wide
集群内部访问
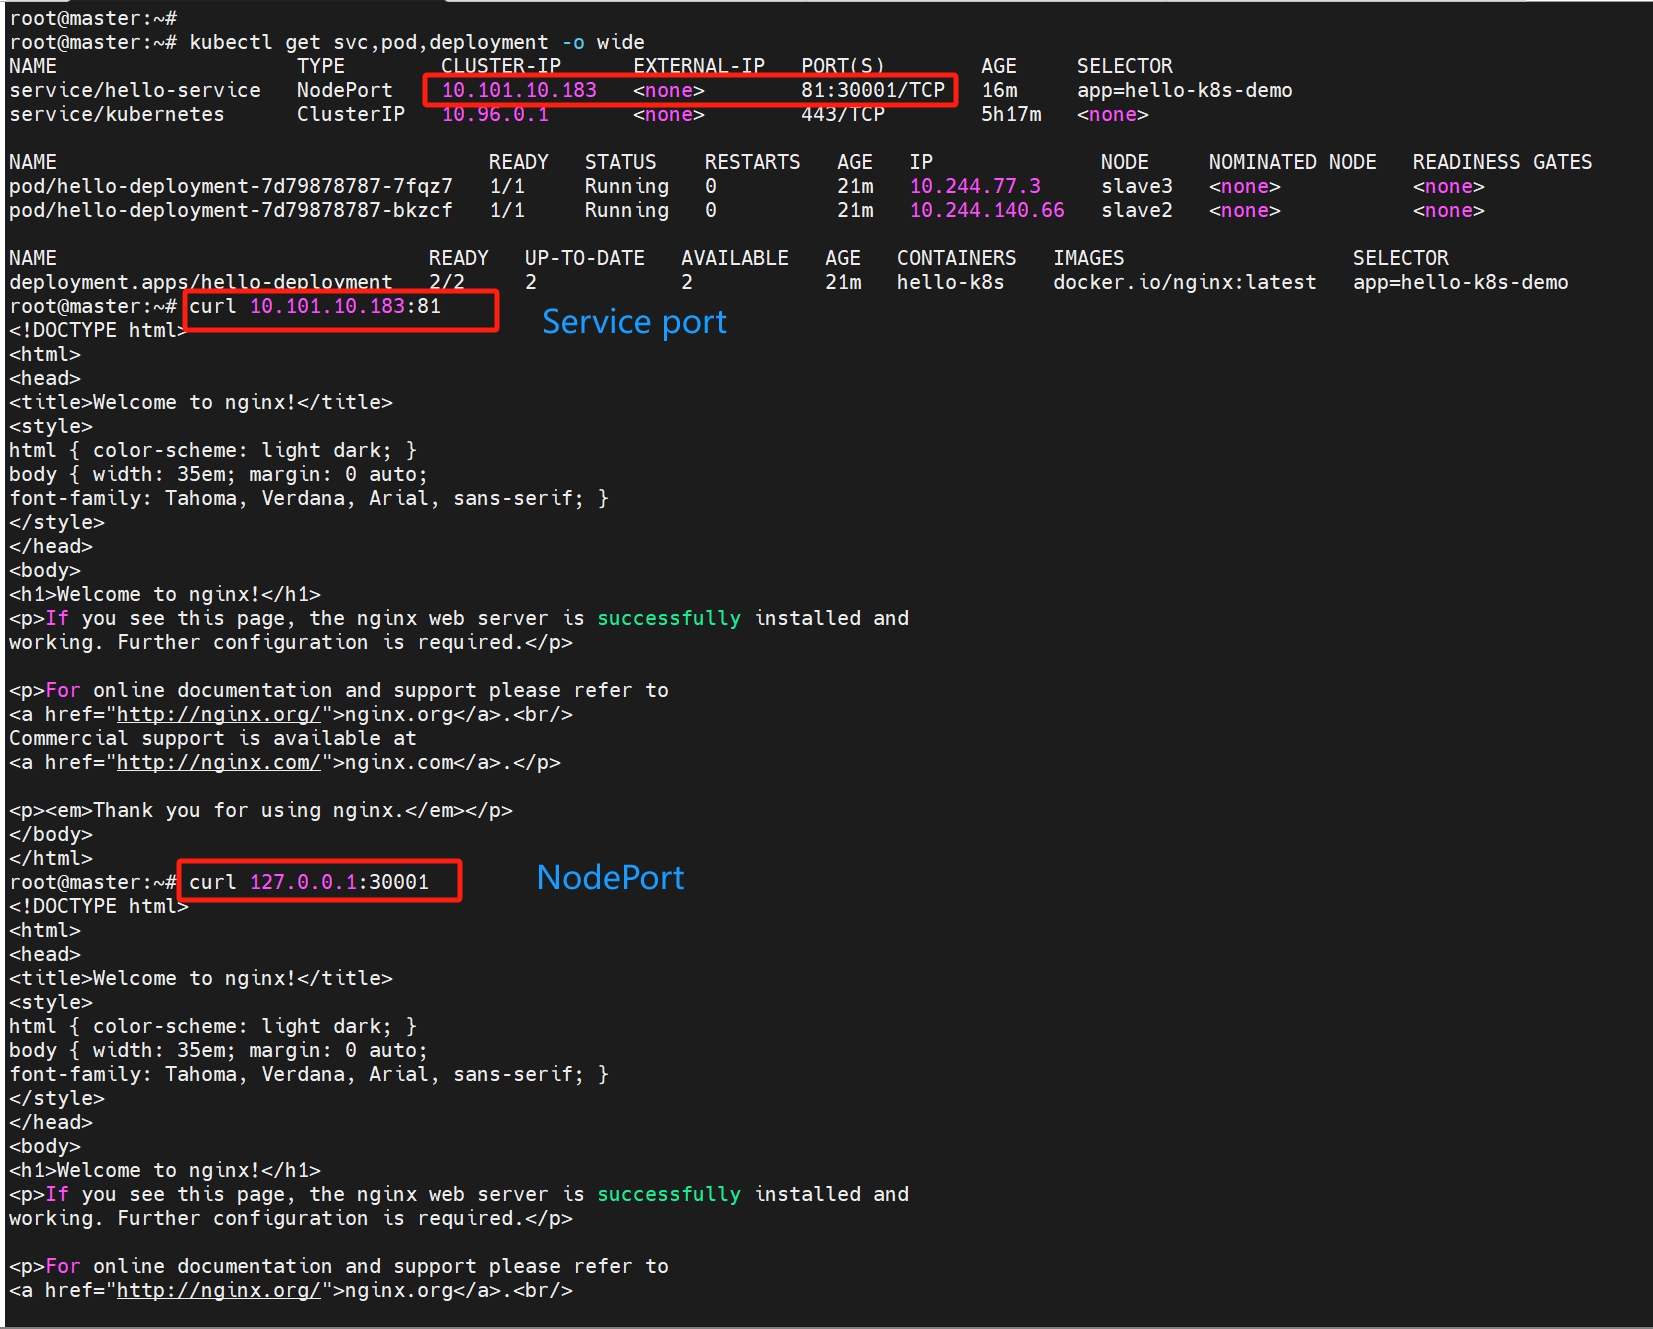
集群外部访问